Flash 5 - Part 5: Buttons
Introduction
Before we can move onto the Action-scripting (and mess around with Movie-Clip animations) we need to create some control gadgets. These can range from the simplest form (a press button) up to complex scroll bars and drag-n-drop objects. In this article we'll learn how to create buttons as these form the basic building-blocks of all the other, fancy UI stuff.
You will soon realise why MacroMedia built everything around those Movie-Clip containers (including Buttons) and why you need to place them inside each other.
The ZIP file
Creating a Button
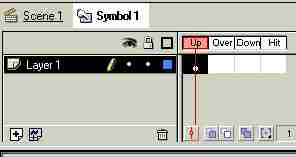
As you'll probably already noticed, the first 4 frames on the time-line have the names "Up", "Over", "Down" and "Hit". I'll use the term 'image' to describe a frame of a button, it basically means shapes, animations (inside a Movie-Clip) and/or symbol Instance(s).
UP - Button frame
This contains the normal graphic 'image' for the default frame.
OVER - Button frame
This contains the image for the button when the mouse is moved over the 'Hit' area.
DOWN - Button frame
You can probably guess what this is ;-) It's the image used when the mouse button is pressed over the 'Hit' area.
HIT - Button frame
This isn't an actual image (it is NEVER shown). It defines the 'hot-spot' boundary of the button.
Invisible Buttons
It is very easy to create invisible buttons. These are useful for adding some particular actions to a part of the screen (for example, a drop-down menu list where you want to be able to click on the text items but not display any graphics over the text itself).
Simply leave the Up, Over and Down frames empty and draw a shape in the Hit frame to define its hot-spot area. You can define a single invisible rectangle button and use it many, many times (even at different sizes -- using the transform/skew/rotate options) on each instance of it.
Normal Buttons
But most buttons will have 3 or 4 frames. Here is an example of a button, I've placed each 'image' side by side for demonstration purposes (of course you would only ever see one at a time when editing the button).
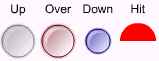
The above picture shows ALL 4 frames of an example button at the same time. The button will appear light grey in its normal state, light red when the mouse cursor is over the 'Hit' area and blue when the mouse button is pressed.
Note: The 'Hit' area only defines the top semi-circle. This means nothing will happen if the mouse cursor is moved over the bottom of the circle.
Tip: You don't have to draw each and every frame of a Button, you can draw a shape, Convert To Symbol and then place Instances of it for each of the Up, Over, Down and Hit frames (using the Effects/Transform panels to change the appearance of each Instance). This not only helps reduce the final Flash movie size, but also the amount of work on your part ;-)
Attaching actions to Buttons
Once you have created your Button symbol you can drag Instances of it onto the main stage work-area and then attach some action-scripting to it. To (for example) stop an animation, launch a URL in your browser or begin a MP3 playing. To attach actions, right-click on the Instance and choose Actions (too obvious, huh?). All buttons actions start with an On Mouse Event statement. I won't jump into action-script because it will be covered in the next article.
Dragging Buttons
Suppose you want to create a dragable button or an object you can pick up, move. If you place a Button Instance on the stage you can click it, but you would not be able to move it using action-scripting. But you can easily move a Movie-Clip Instance by using its Instance Name and either attaching it to the mouse cursor OR change its (x,y) position.
The solution is to place the Button inside a Movie-Clip container. Now you can move the parent Movie-Clip and so move the child Button inside it. Most UI gadgets are based on this simple, but effective idea.
Closing words
The next part will look at some basic Action-Scripting which will include our button symbol.
Happy Hitting